
Load Balance Overview
As per AppSense Load Balance best practises, there are two authentication methods to understand before load balancing.
- Anonymous
- Windows Authentication
“AppSense recommends implementing Anonymous authentication for all implementations except where Windows Authentication is explicitly required due to regulatory or security requirements”
For Anonymous access the only tasks that is required is disable Loopback protection on the Management/Personalizaiton Server which is covered in this article Step 12 AppSense Server Changes.
NOTE: The Management Centre consoles will not function correctly using the load balanced virtual server because the console always uses Windows Authentication. Therefore when adding server to management/personalization servers in console, add the local server name/localhost.
For the purpose of the article we will choose Windows Authentication as the worst case/more complicated setup.
The following AppSense VM’s will be used in the LAB Setup for Load Balancing:-
- LAB-APS1 : 192.168.0.70
- LAB-DDC2: 192.168.0.71
Prerequisites
- A Service Account for the AppSense Load Balance (not the previous configuration/service account
- A DNS Name for Load Balance (in this case LAB-APS)
Appsense Load Balance Service Account
Step 1 : Launch Powershell as administrator
Step 2 : Run the following commands (Note the lab balance service account in bold)
- Setspn.exe -S http/LAB-APS LAB\svc-appsenselb
- Setspn.exe -S http/LAB-APS.LAB.LOCAL LAB\svc-appsenselb
Step 3: Confirm the Set SPN is success, indicated by Updated Object

Step 4: Launch Active Directory Users & Computer , Browse Properties of svc-appsenselb and Change svc-appsenselb Delegation to Trust this user for delegation to any service (Kerberos)

AppSense Server Changes (Personalization/Management)
Step 1: Add LAB\svc-appsenselb account to the following groups on the AppSense Servers (Management/Personalization)
- Adminstrators
- IIS_IUSRS
Step 2: Grant LAB\svc-appsenselb Read-Only to Directory – C:\Windows\Temp
Step 3: Launch IIS and browse to Application Pools
Step 4: Right-click on all of the required application pools (see below), Choose Advance Settings
- Management (DeploymentPool, DownloadsPool, ManagementServerPool)
- Personalization (PersonalizationServerPool)
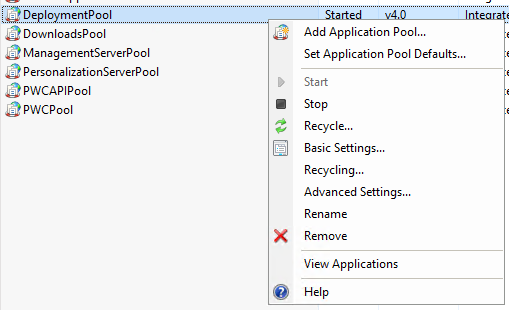
Step 5: Under Identity , change NetworkService, by Selecting …
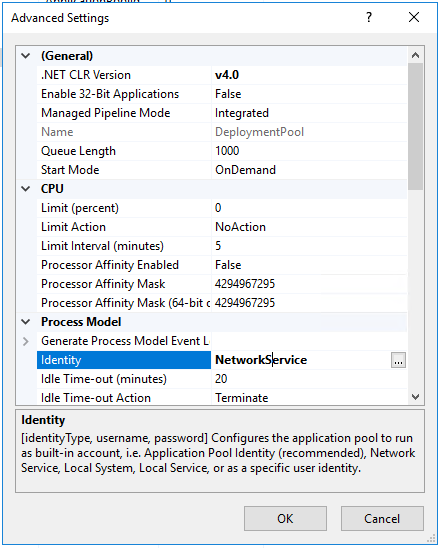
Step 6: Under Application Pool Identity, Choose Custom account by Clicking Set

Step 7: Enter the Load Balance Service Account Username/Password, Click Ok, and Ok twice agin to return to applicaiton pool.

Step 7: Repeat this for the rest of the Application Pools listed in Step 4 depending on which service is being load balanced
Step 8: Launch IIS, browse to LAB-APS1\Sites\Management or Personalization and Choose Configuration Editor under Management Section

Step 9: Under Section: Browse System.WebServer\Security\authentication and Select Windows authentication

Step 10: Under UseAppPoolCredentials , set to True. Click Apply in the top right of the IIS Management window to save the changes made

Step 11: Check Web.Config has UsePoolCredentials set
- C:\program files\appsense\environment manager\personalization server\web.config
- C:\program files\appsense\management center\server\Web Site\web.config

Ensure that UseAppPoolCredentials=”true” has been added to the line as per below

Step 12: Add the following registry key (Ref http://support.microsoft.com/kb/926642)
“HKLM\System\CurrentControlSet\Control\LSA\MSV1_0” – REG_MULTI_SZ value called BackConnectionHostNames
Edit BackConnectionHostNames with the following
- LAB-APS
- LAB-APS.LAB.LOCAL
- LAB-APS1 or LAB-APS2
- LAB-APS1.LAB.LOCAL or LAB-APS1.LAB.LOCAL
- 192.168.0.70 (IP address of server)
- 192.168.0.93 (VIP

Step 13: Run the following in powershell as administrator
sc sdset “AppSense Deployment Service” D:(A;;LCLO;;;<SID>)(A;;CCLCSWRPWPDTLOCRRC;;;SY)(A;;CCDCLCSWRPWPDTLOCRSDRCWDWO;;;BA)(A;;CCLCSWLOCRRC;;;IU)(A;;CCLCSWLOCRRC;;;SU)S:(AU;FA;CCDCLCSWRPWPDTLOCRSDRCWDWO;;;WD)
Replace <SID> with LAB\svc-appsenselb SID ( can be found by running the below command where AD powershell snap-in is available.

Add Load Balance Configuration
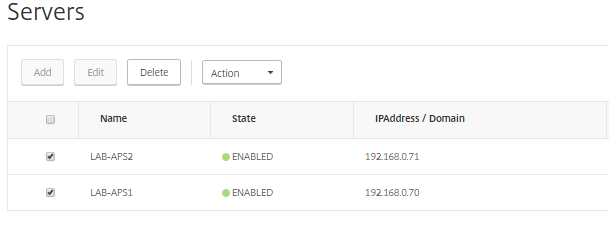
Step 1: Browse to Traffic Management > Load Balancing > Servers

Step 2: At Server, Click Add

Step 3: Enter Name and IP Address below, then click create
- Name: LAB-APS1
- IP Address: 192.168.0.70

Step 4: Click Add again under Server, Enter Name and IP Address below, then click create
- Name: LAB-APS2
- IP Address: 192.168.0.71

Step 5: The two server will now be add to server page.
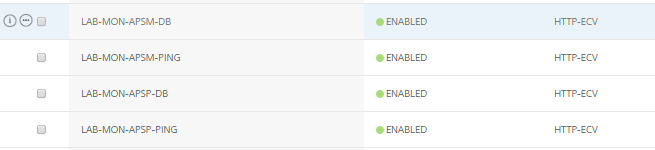
Step 5: Browse to Traffic Management > Load Balancing > Monitors and Click Add

Step 6: Add the following information, then click Special Parameters
- Name: LAB-MON-APSM-DB
- Type : HTTP-ECV
- Interval : 30

Step 7: Add the following information
- Send String : GET /ManagementServer/deployment/dbmonitor.aspx
- Receive String : OK

Step 8: Repeat Step 5-7 with the following different Monitors
AppSense Management ping: –
- Name: LAB-MON-APSM-PING
- Type : HTTP-ECV
- Interval : 5
Special Parameter –
- Send String: GET /ManagementServer/deployment/pingmonitor.aspx
- Receive String : OK
AppSense Personalization DB Monitor: –
- Name: LAB-MON-APSP-DB
- Type : HTTP-ECV
- Interval : 30
Special Parameter –
- Send String: GET /PersonalizationServer/dbmonitor.aspx
- Receive String : OK
AppSense Personalization Ping Monitor: –
- Name: LAB-MON-APSP-DB
- Type : HTTP-ECV
- Interval : 5
Special Parameter –
- Send String: GET /PersonalizationServer/pingmonitor.aspx
- Receive String : OK
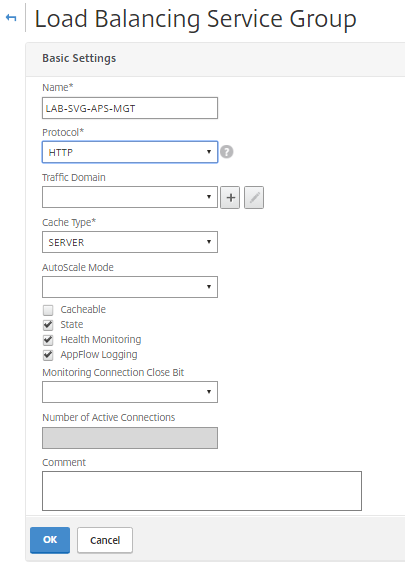
Step 9: Browse to Traffic Management > Load Balancing > Service Groups

Step 10: Add the following info on basic setting, click OK
- Name: LAB-SVG-APS-MGT
- Protocol: HTTP
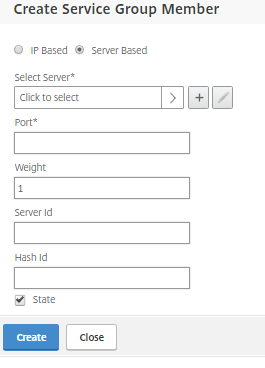
Step 11: Click No Service Group Members under services and groups section

Step 12: Choose Server Based, then Click to Select
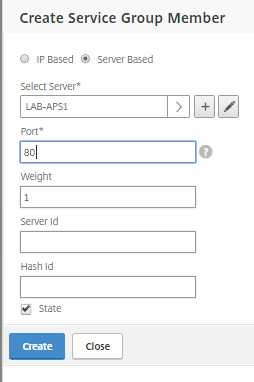
Step 13: Under Select Server Choose LAB-APS1 , Add Port 80 , click create and then repeat step 9/10 for LAB-APS2

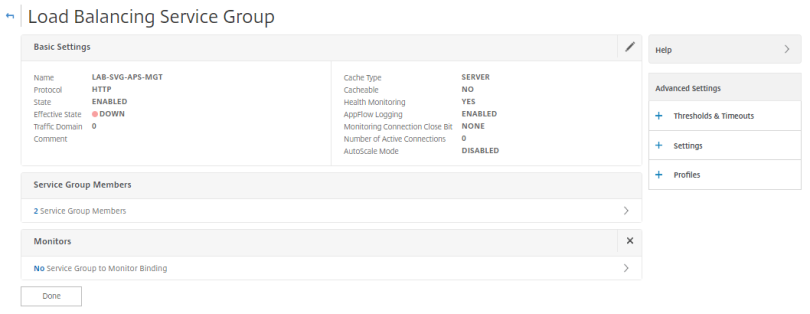
Step 14: Click OK at Load Balancing Service Group Main Page to create Service Group.

Step 15: Select Monitors from Advanced Setting, Click No Service Group to Monitor Bindings
Step 16:

Step 17: Select LAB-MON-APSM-DB Monitor, Click Select
![]()
Step 18: Select Bind with weight left at 1

Step 19: Repeat for Step 16-18 LAB-MON-APSM-PING
Step 20: Add Thresholds & Timeout from advanced Setting. Add 2 to Monitor threshold (both monitor must be successful otherwise service will be down)

Step 21: Click Done to complete service group

Step 22: Repeat Step 9-14 with the additional appsense management port for administrators:
Service Group:-
- Name: LAB-SVG-APS-MGT-ADMIN
- Protocol: HTTP
- Port: 7751
- Server Members : LAB-APS1, LAB-APS2
- Monitor : TCP
- No Threshold

Step 23: Repeat Step 9-14 with the additional appsense personalization port for administrator
Service Group
- Name: LAB-SVG-APS-PER
- Protocol: HTTP
- Port: 8080
- Server Members : LAB-APS1, LAB-APS2
- Monitor : LAB-MON-APSM-PING & LAB-MON-APSM-PING
- Threshold = 1
- Name: LAB-SVG-APS-PER-ADMIN
- Protocol: HTTP
- Port: 7771
- Server Members : LAB-APS1, LAB-APS2
- Monitor : TCP

Step 24: Browse to Traffic Management\Load Balancing\Virtual Server, Click Add
Step 25: Enter the following information. Click Ok
- Name: LAB-VSRV-APS-MGT
- Protocol: HTTP
- IP Address: 192.168.0.93
- Port: 80

Step 26: Select No Load Balancing Virtual Server ServiceGroup
Step 27: Under ServiceGroup Binding, Click to Select

Step 28: Select LAB-SVG-APS-MGT and Click Select

Step 29: Click Bind

Step 30: Click Continue,then select Persistence from Advanced Setting

Step 31: Set the following information, then click OK
- Persistence: Source IP
- Timeout(min): 2
- IPV4 Netmask: 255.255.255.255
- IPV6 Mask Length: 128

Step 32: Repeat Step 24-31
AppSense Management Administrative Access
VServer & Service Group
- Name: LAB-VSRV-APS-MGT-ADMIN
- Protocol: HTTP
- IP Address: 192.168.0.93
- Port: 7751
- Service Group: LAB-SVG-APS-MGT-ADMIN
Persistance
- Persistence: Source IP
- Timeout(min): 2
- IPV4 Netmask: 255.255.255.255
- IPV6 Mask Length: 128
AppSense Personalization
VServer & Service Group
- Name: LAB-VSRV-APS-PER
- Protocol: HTTP
- IP Address: 192.168.0.93
- Port: 8080
- Service Group: LAB-SVG-APS-PER-ADMIN
NOTE: No persistance required
AppSense Personalization Administrative Access
VServer & Service Group
- Name: LAB-VSRV-APS-PER-ADMIN
- Protocol: HTTP
- IP Address: 192.168.0.93
- Port: 7771
- Service Group: LAB-SVG-APS-PER-ADMIN
Persistance
- Persistence: Source IP
- Timeout(min): 2
- IPV4 Netmask: 255.255.255.255
- IPV6 Mask Length: 128
Step 53: Confirm all 4 Virtual Servers appear Up.

Test Load balancing Connectivty to website
Confirm the following repsonses using the DNS Name of the Load balance:-
http://lab-aps:8080/PersonalizationServer/pingmonitor.aspx

http://lab-aps:8080/PersonalizationServer/dbmonitor.aspx

http://lab-aps.lab.local/ManagementServer/deployment/pingmonitor.aspx

http://lab-aps.lab.local/ManagementServer/deployment/dbmonitor.aspx
Test Load balancing Connectivity to Management Console
Step 1:Launch AppSense Manegment Console, Add Management Server. Then click Add
- Friendly Name: LAB-APS
- Server Name: LAB-APS

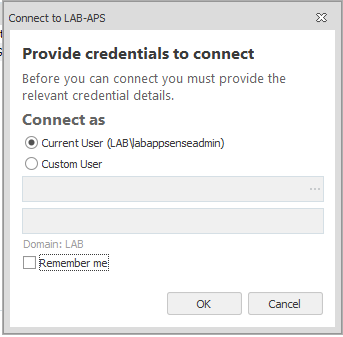
Step 2:Connect to LAB-APS Management Server which has just been setup

Step 3:Confirm connectivity to Management Console is successful.

Step 4:Launch AppSense Environment Manager Console,Select Personalization
Add Personalization Server. Then click Add
- Friendly Name: LAB-APS
- Server Name: LAB-APS

Step 5:Connect to LAB-APS Personalization Server which has just been setup

Step 6:Confirm connectivity to Management Console is successful.

Hi David,
Thank you for an awesome post!
I am relatively new to this tech, therefore still unclear as to why LB is required at DNS level (be it via F5 or Netscalers) when the LB exists on the Management and Personalisation servers themselves?
Any clarification would gratefully recieved.
Regards,
N.
I seem to be stuck around step 13 when setting up the service group on the netscaler. I can’t see how port 80 can be used here without a host header… 10.1 installs the management site as its own site, ie not under default website, so the only way to use port 80 is to put a host header in – but then the monitor on the netscaler fails. What am I missing here??
Unquestionably consider that which yoou stated. Your favourite
reason seemed to be at the internet the easiest thing to take note of.
I say to you, I certainly get irked even as other peoploe think
about issues that they just don’t realize about.
You controllled too hitt the nail upon the highest and defined
out the whole thing with no need side effect , other people can take a signal.
Will likely be back to get more. Thanks