

Configure App-V Content Share
Step 1: Determine location to host the Appv Content, this usually will be a Highly Available File Store on Windows/Storage Device.
Step 2: Run the following powershell script to create the Folder/Share with correct AD
Replace the variables relevant to your setup
# Variables $folder = 'D:\AppVContent' $appvshare = 'AppVContentAdd Package to Content Shared and Management Console
Step 1: Copy the Package into the Content share. \\lab-appv1\appvcontent$Step 2: Load the Management Console (http://lab-appv:50001 or http://localhost:50001 from the management server itself. Click Add or Upgrade under Package Section
Step 3: Specify the UNC Path of the client package (.appv) , in my case it will be \\LAB-APPV1\AppVContent$\ADOB_PhotoShop_7.0_X86_1\ADOB_PhotoShop_7.0_X86_1.appv. then Click Add Package
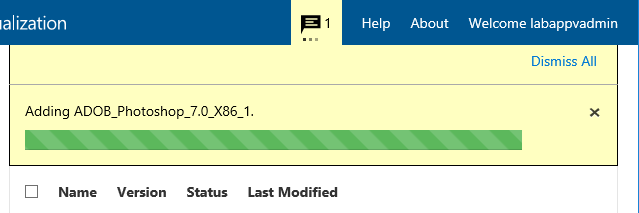
Step 4: Package will be added to the Management Console, progress will be shown and confirmation when successfully added.
Step 5: Click on the Package to begin modification
Step 6: Under AD Access, Click Edit
Step 7: Click Add Group
Step 8: Select AD Group, LAB\grp-appv-adobe-ps-7, Click Grant Access
Step 9: AD Group will now be listed against AD Access. Click the blue ADOB_PhotoShop_7.0_X86_1 to return to main configuration screen
Step 10: Click Publish
Step 11: Status of Package should not change to Published (Green instead of Grey)
Step 12: At main package screen, package will not be listed as published and show last modified date.
Step 13: Repeat Step 3-12 for every additional package you would like to add.
Configure Group Policy for App-V Client
Step 1: Open Group Policy Management, Browse to the Group Policy that applies to the Client (in my case LAB-Servers-VCS-Workload-Default Policy). Right Click and Edit. Step 2: Browse to Computer > Administrative Template > System > AppV . Right Click Enable App-V Client and click Edit. Select Enabled. Click OKStep 3: Browse to Computer > Administrative Template > System > AppV >Publishing. Right Click Enable Publishing Refresh UX and click Edit. Select Enabled. Click OK
Step 4: Browse to Computer > Administrative Template > System > AppV >Publishing. Right Click Publishing Server 1 Settings and click Edit. Select Enabled. Click OK Add the following details:-
- Publishing Server Display Name: LAB-APPV
- Publishing Server URL: http://lab-appv:50002
- Global Publishing Refresh: False
- Global Publishing Refresh on logon: False
- Global Publishing Refresh Interval: 1
- Global Publishing Refresh Interval Unit: Hour
- User Publishing Refresh: True
- User Publishing Refresh on logon: True
- User Publishing Refresh Interval: 1
- User Publishing Refresh Interval Unit: Hour

Test Client Connectivity & Application Publishing
Step 1: Run the following command to confirm group policy has applied.Get-AppVPublishing Server
Step 2: Run the following command to begin a manual sync of the appv package for user running the command
Sync-AppvPublishing Server 1
Step 3: Run the following command to cache the packages 100% on the local disk.
Get-AppvClientPackage -All | Mount-AppvClientPackage
Step 4: Confirmation of mount is shown with the below screen & App GUID's showing AppV Cache (%Programdata%\Appv) unless redirected.
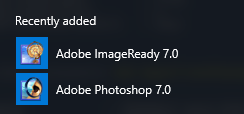
Step 5: Start Menu icons will appear for the App-V Application.
Step 6: Upon Launching App-V Apps (Adobe Photoshop 7.0) apps will successfully launch
$appvserverGroup = 'GRP-LABAPPVSERVERS'
$appvadminGroup = 'GRP-LABAPPVADMINS'
# Create APP-V Content folder
New-Item -ItemType Directory -Path $folder
# Sets Edit permission for AppV Admins Group
icacls $folder /grant "${appvserverGroup}:(OI)(CI)(RX)"
# Set Read and Execute Permissions for AppV Servers Group
icacls $folder /grant "${appvadminGroup}:(OI)(CI)(M)"
# Setting Read and Execute Permissions for Domain Users
icacls $folder /grant "Domain Users:(OI)(CI)(RX)"
# Created SMB Share and Allows Everyone Full Access
New-SmbShare -Name $appvshare -Path $folder -FullAccess 'EVERYONE'
Add Package to Content Shared and Management Console
Step 1: Copy the Package into the Content share. \\lab-appv1\appvcontent$
Step 2: Load the Management Console (http://lab-appv:50001 or http://localhost:50001 from the management server itself. Click Add or Upgrade under Package Section
Step 3: Specify the UNC Path of the client package (.appv) , in my case it will be \\LAB-APPV1\AppVContent$\ADOB_PhotoShop_7.0_X86_1\ADOB_PhotoShop_7.0_X86_1.appv. then Click Add Package
Step 4: Package will be added to the Management Console, progress will be shown and confirmation when successfully added.
Step 5: Click on the Package to begin modification
Step 6: Under AD Access, Click Edit
Step 7: Click Add Group
Step 8: Select AD Group, LAB\grp-appv-adobe-ps-7, Click Grant Access
Step 9: AD Group will now be listed against AD Access. Click the blue ADOB_PhotoShop_7.0_X86_1 to return to main configuration screen
Step 10: Click Publish
Step 11: Status of Package should not change to Published (Green instead of Grey)
Step 12: At main package screen, package will not be listed as published and show last modified date.
Step 13: Repeat Step 3-12 for every additional package you would like to add.
Configure Group Policy for App-V Client
Step 1: Open Group Policy Management, Browse to the Group Policy that applies to the Client (in my case LAB-Servers-VCS-Workload-Default Policy). Right Click and Edit.
Step 2: Browse to Computer > Administrative Template > System > AppV . Right Click Enable App-V Client and click Edit. Select Enabled. Click OK
Step 3: Browse to Computer > Administrative Template > System > AppV >Publishing. Right Click Enable Publishing Refresh UX and click Edit. Select Enabled. Click OK
Step 4: Browse to Computer > Administrative Template > System > AppV >Publishing. Right Click Publishing Server 1 Settings and click Edit. Select Enabled. Click OK
Add the following details:-


- Publishing Server Display Name: LAB-APPV
- Publishing Server URL: http://lab-appv:50002
- Global Publishing Refresh: False
- Global Publishing Refresh on logon: False
- Global Publishing Refresh Interval: 1
- Global Publishing Refresh Interval Unit: Hour
- User Publishing Refresh: True
- User Publishing Refresh on logon: True
- User Publishing Refresh Interval: 1
- User Publishing Refresh Interval Unit: Hour
Test Client Connectivity & Application Publishing
Step 1: Run the following command to confirm group policy has applied.

Step 2: Run the following command to begin a manual sync of the appv package for user running the command

Step 3: Run the following command to cache the packages 100% on the local disk.

Step 4: Confirmation of mount is shown with the below screen & App GUID’s showing AppV Cache (%Programdata%\Appv) unless redirected.


Step 5: Start Menu icons will appear for the App-V Application.
Step 6: Upon Launching App-V Apps (Adobe Photoshop 7.0) apps will successfully launch
